Breville Instruction The Barista Touch: Pro Ultimate Guide
At Breville, your safety comes first. We focus on creating products that prioritize your well-being. Please be careful when using any electrical appliance. Follow these essential guidelines in the Breville Instruction the Barista Touch.
Essential Safety Guidelines:
Please read all instructions prior to use and keep them for future reference.
- Make sure you read all instructions thoroughly before operating the appliance and save them for future reference.
- Avoid direct contact with hot surfaces; Always use the handle or knob as directed in this manual.
To avoid the risk of fire, electric shock, or injury, do not immerse the power cord, plug, or appliance in water or any other liquid. Always supervise children when using or near this appliance.
If the appliance needs to be:
- Left unattended
- Cleaned
- Moved
- Assembled
- Stored
Always turn off the device by pressing the power button and unplugging it from the wall. Let it cool completely before you clean, remove or store it.
It is a good idea to check the appliance and its power cord often. If you notice any damage to the cord or plug, or if the appliance doesn’t work correctly or is damaged, stop using it immediately. Then, contact Breville Consumer Support.
Singing accessories not recommended by Breville may cause fire, electric shock or injury. Always follow the Breville instruction the Barista Touch to be safe.
Do not allow the power cord to hang over the edge of a counter or table. Keep away from hot surfaces to avoid accidents.
Safe Placement and Use:
Ensure you place the appliance safely away from the edge of the counter or table. Make sure the surface is even, spotless, and free of moisture.
Don’t put the appliance near hot gas or electric burners. Also, keep it away from a heated oven.
Avoid operating the device in enclosed spaces or cupboards.
Intended Use Only:
The manufacturer designed this appliance for home use only. Do not use it for anything else. It is not safe for outdoor use or in cars or boats.
Essential Guidelines for the BES880 Espresso Machine:
It is best to plug the espresso machine into its electrical circuit. Make sure it is properly grounded and not connected to other appliances. Follow the Breville instruction the Barista Touch for safety.
- Avoid contact with moving parts.
- Before use, check the bin hopper for any foreign objects.
- Use only cold water in the water tank. Do not add other liquids such as filtered, demineralised or distilled water. These can change the taste of your coffee and damage the performance of the machine.
- Make sure the portafilter is firmly locked into the group head before you start extraction. Do not remove it while drainage is occurring.
- Be careful after steaming milk. The automatic cleaning feature will release hot steam when you lower the steam wand.
- Be careful when descaling the machine, as hot steam may escape. Turn off the machine and let it cool for at least an hour before starting it. Make sure the drip tray is empty and correctly in place. For more details, see the ‘Descale’ section on page 21.
- Do not try to open or fix the espresso machine on your own. If you need maintenance beyond cleaning, contact Breville Consumer Support or go to an authorised Breville service centre.
Water Filter Instructions:
- Keep the filter cartridge out of the reach of children.
- Store the cartridges in their original packaging in a dry place.
- Protect cartridges from heat and direct sunlight.
- Do not use damaged cartridges.
- Avoid opening the filter cartridge. If you are away for a long time, empty the water tank and replace the cartridge.
Short Cord Safety Instructions:
Breville designed your appliance with a short power cord to reduce the risk of injury or damage from being pulled or dropped. If you want to use a long cord or an extension cord, be careful. For more details, see the Breville instruction the Barista Touch.
If you use an extension cord:
- The cord or extension cord must have the same or higher electrical rating than the appliance. This ensures safe operation.
- Make sure the cord doesn’t hang over the edge of the counter or table. It can prevent accidents such as falling or falling, especially for children.
- The extension cord should include a 3-prong grounding plug.
Breville Assist® Plug Feature:

Your Breville appliance has a special Assist® plug. It has a finger hole to help you pull it out of the power outlet more easily.
Intended for Household Use Only – Retain These Instructions
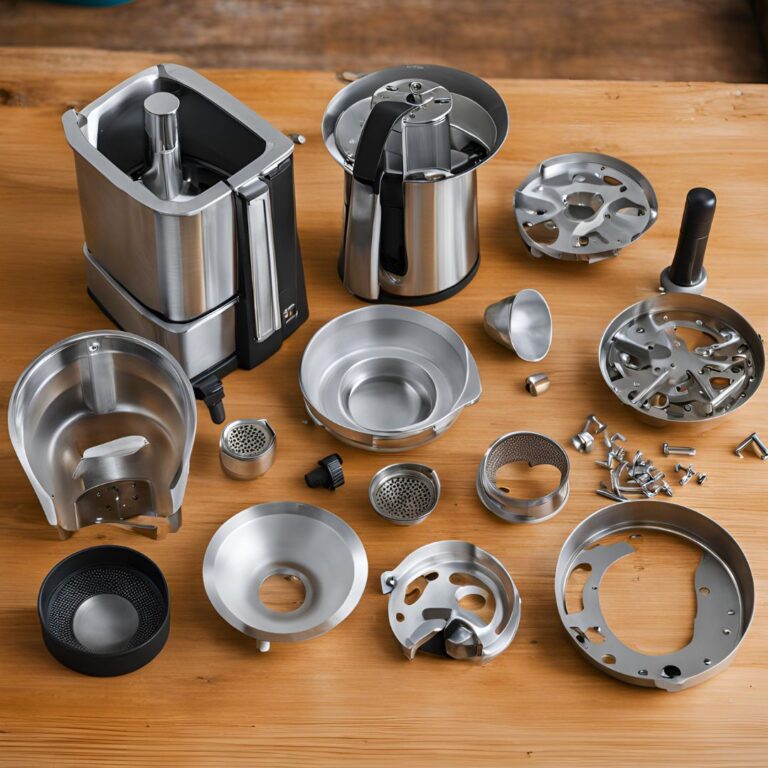
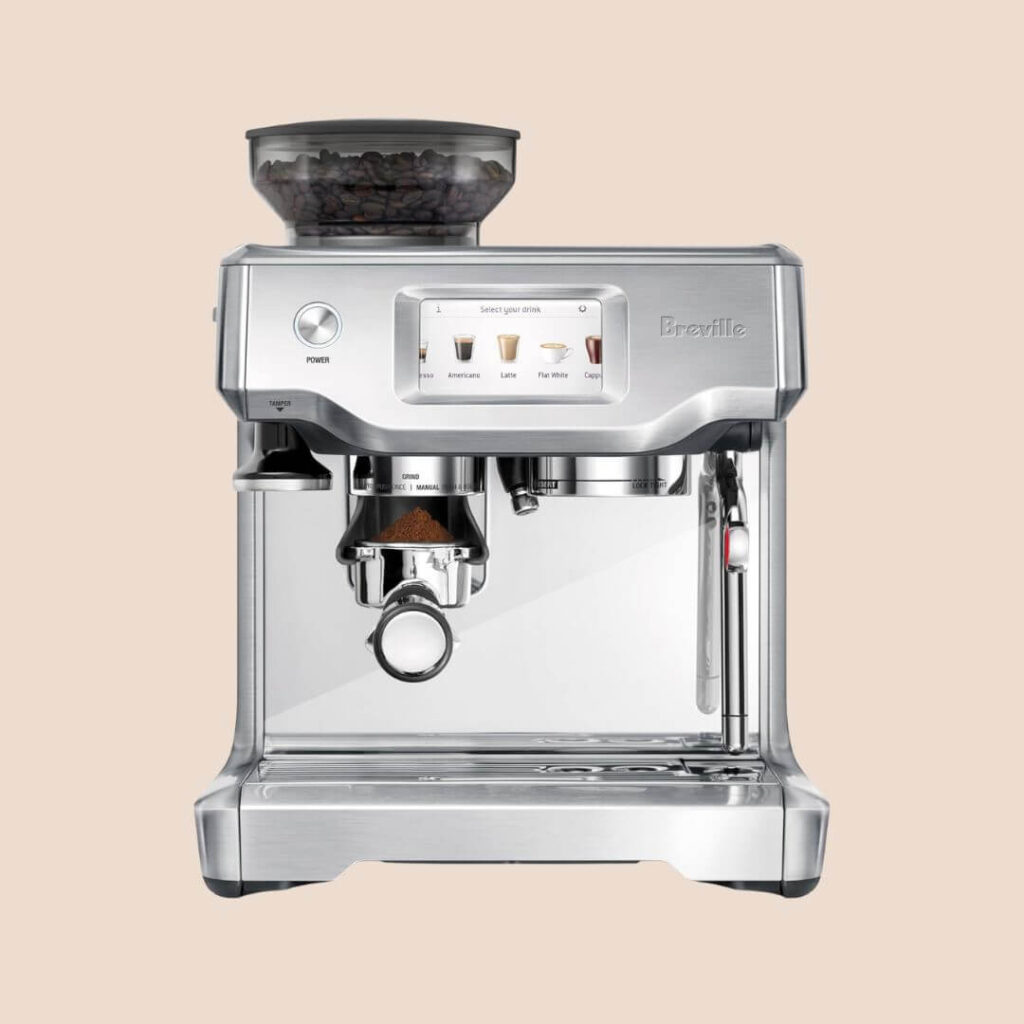
Component Overview:
- ½ lb Bean Hopper: Features a locking mechanism for easy removal, storage, and transfer of coffee beans.
- Integrated Conical Burr Grinder: Ensures consistent grind size.
- Touchscreen Control Panel: Displays current settings and provides a user-friendly interface.
- Grind Size Selector: Adjustable from fine to coarse for espresso.
- Power Button: Simple on/off operation.
- Removable 54mm Tamper: Integrated for convenience.
- Grind Outlet: Allows hands-free grinding with the cradle.
- 54mm Stainless Steel Portafilter: Includes commercial-style spouts.
- Removable Wet & Dry Coffee Separator Drip Tray: Features an “Empty Me!” indicator for easy maintenance.
- 68 fl. oz (2L) Removable Water Tank: Comes with a replaceable water filter to reduce impurities and scale.
- Group Head: Ensures optimal brewing temperature.
- Dedicated Hot Water Outlet: For additional beverage options.
- Extra-Tall Cup Clearance: Accommodates taller mugs.
- Easy-Clean Steam Wand: For automatic milk texturing.
- Milk Temperature Sensor: Ensures optimal frothing.
- Storage Tray: Located behind the drip tray to keep accessories when not in use.
All components of the Barista Touch™ that come in contact with coffee, water, and milk are BPA-free.
Included Accessories:
- Stainless Steel Milk Jug
- Cleaning Disc
- Cleaning Tablets
- Dual Wall Filter Baskets (1 cup & 2 cups): Designed for use with pre-ground coffee.
- Single Wall Filter Baskets (1 cup & 2 cups): Ideal for grinding fresh whole coffee beans.
- Water Filter and Holder
- Cleaning Brush
- The Razor™ Precision Dose Trimming Tool
- Steam Wand Cleaning Tool
- Water Hardness Test Strip
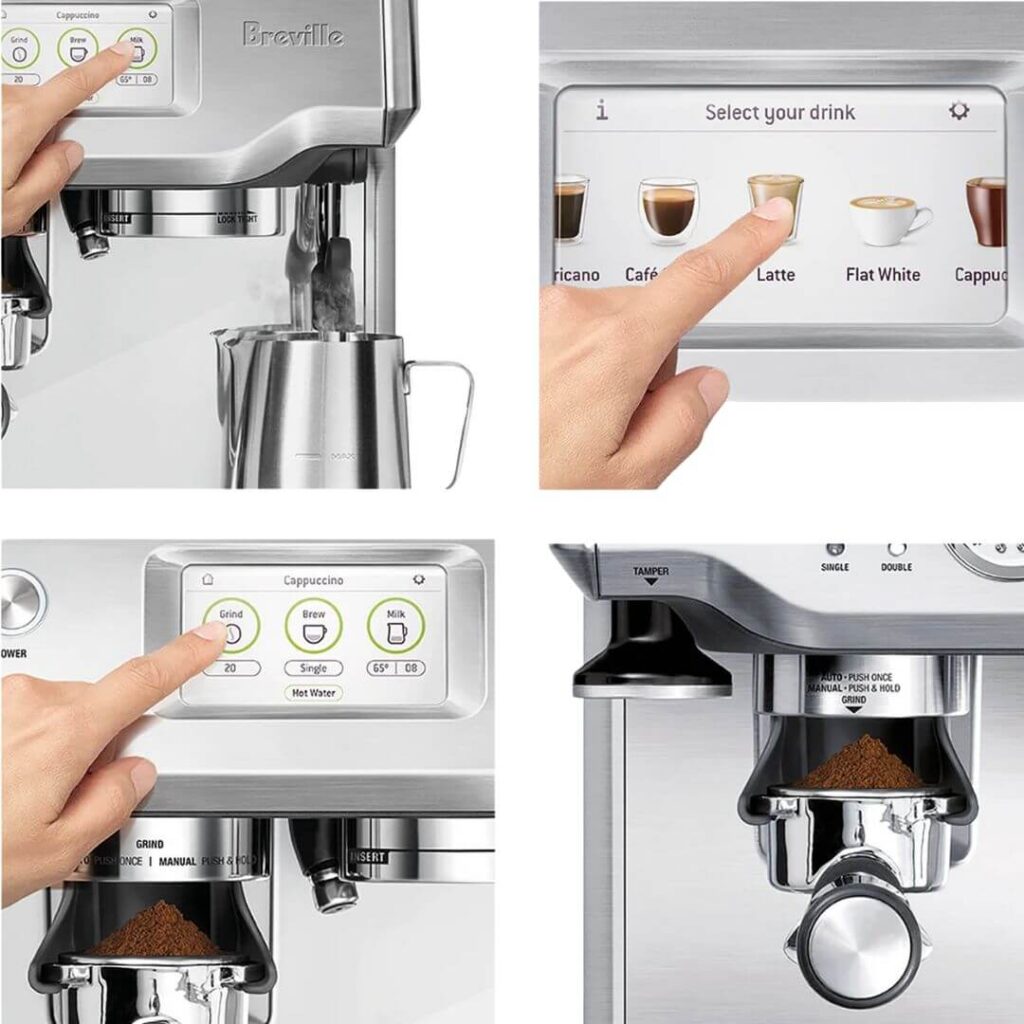
Barista Touch Features:

- Color Touchscreen Interface:
You can quickly swipe to the drinks menu. With Breville instruction the Barista Touch, you can change shot volume, milk texture or milk temperature. You can save your favourite settings.
- Automatic Hands-Free Milk Texturing:
The machine automatically froths milk at the temperature and style of your choice. Whether you prefer a smooth latte or a creamy cappuccino, it’ll be just right. When you put the steam wand back in place, it automatically cleans the remaining milk.
- Quick Heat-Up Time:
The machine has an intelligent heating system. It heats up to the perfect temperature for brewing in just 3 seconds.
- Built-In Conical Burr Grinder:
This grinder has stainless steel conical burrs. They create more surface area for better espresso flavour. Both the upper and lower burrs can be conveniently taken out for cleaning.
- Customizable Grind Size:
You can choose espresso grind settings from fine to coarse. This helps you get the best flavour from your coffee.
- Adjustable Grind Amount:
You can adjust how much fresh ground coffee goes into the filter basket. It depends on whether the grind is fine or coarse.
- Automated Dosing
Use the filter size button to choose between a 1-cup or 2-cup filter basket. The grinder will then automatically give you the correct amount of coffee for a single or double shot.
- Hands-Free Grinding:
You can grind coffee quickly and without using your hands. The auto-stop feature will stop the grinder when it’s done and pour the coffee directly into the portafilter.
- The Razor™ Precision Dose Trimming Tool:
This patented tool features a twisted blade that trims coffee grounds to ideal levels, ensuring precise dosage and consistent extraction.
- Customizable Temperature Control:
Adjust the temperature settings for the best possible coffee taste.
- Electronic PID Temperature Regulation:
Electronic PID control keeps the temperature constant. This helps make your coffee taste better and ensures that each cup is consistent.
- Instant Hot Water Access:
There is a hot water outlet for making Americanos. You can also use it to pre-heat your cups.
- Low-Pressure Pre-Infusion:
This feature uses a lower water pressure at the start of the discharge. This helps the coffee grounds slowly expand for a more vigorous extraction.
- Volumetric Control Options:
You can choose a preset volume for 1 or 2 cups. You can also manually adjust the shot volume to your liking.
- Dry Puck Feature:
After brewing, this function removes excess water from the coffee grounds in the filter basket. This makes it easy to throw away the used coffee puck.
Assembly Instructions:
- Initial Preparation Before Use:
Before using your espresso machine for the first time, remove all labels and packaging. Do not forget to take all the parts and accessories from the box. Throw away any plastic bags with water filters and filter holders. Wash all parts, such as the water tank, portafilter, filter basket and jug, with warm water and mild soap. Rinse well and dry thoroughly.
- Installing the Water Filter:
- Remove the water filter and holder from the plastic bag.
- Immerse the filter in cold water for five minutes.
- Rinse the filter holder with cold water.
Set a reminder for the next month to replace the filter. We suggest replacing it every three months.
- Place the filter into both sections of the filter holder.
- To connect the filter holder to the water tank, position the base of the holder with the adapter inside the tank and press down until it clicks into place.
Fill the water tank with cold water, then slide it into position on the back of the machine, locking it in place.
Note:
Replacing the water filter every three months or after 10.6 US gallons (40L) will help reduce the need for descaling. You can purchase filters on the Breville website.
Important:
Avoid using highly filtered, demineralized or distilled water, as this can negatively affect the taste of your coffee.
- Initial Use:
- Press the power button to turn on the machine.
- Follow the on-screen instructions for initial setup.
- When the setup is complete, the machine will indicate that it is ready for use. Your Barista Touch is now on. Select “Guide” for additional information about your machine or exit to choose your drink.
Touch “Guide” for a step-by-step process of making your first coffee. Tap the shape or arrow icon to access the beverage menu or repeat the setup process. To revisit the guide later, navigate to the Settings menu.
Note:
If your water hardness tests at 4 or 5, we highly recommend switching to a different water source.
Using filtered, bottled spring or mineral water can help your built-in filter last longer and reduce how often you need to descale. It also improves the taste. Always check the water hardness and enter this information into the machine.
Avoid using highly filtered water, like reverse osmosis (RO) water, unless you add minerals back. Never use distilled water or water with very few minerals, as it will affect the flavour.
- Grinding Coffee:
- Place the bean hopper on top of the machine and turn the dial to secure it.
- Fill the funnel with fresh coffee beans.
Tip:
We recommend using high-quality 100% Arabica beans with a “roasted on” date rather than a “best before” or “use by” date. Coffee beans taste best between 5 and 20 days after roasting. Using stale beans can cause the coffee to pour too quickly and taste bitter or watery. For more tips, check the Breville instruction the Barista Touch.
- Selecting Your Drink:
To access the drinks menu, touch the home icon. Swipe through the menu to choose your drink. Tap the ‘Help & Advice’ icon to access the Barista Touch™ Guide.
Note:
Keep the touchscreen clean and dry to ensure proper functionality.
- Customising Your Drink:
On the drink screen, you can personalise your drink by tapping the oval button. Note that to adjust the grind size, you must use the dial located on the side of the machine.
Adjusting Grind Size:

- Selecting Your Filter Basket:
Start by choosing the right filter basket for your espresso. For one-cup or lighter flavours, use the single-cup filter basket. For two cups or stronger flavours, use the double-cup filter basket, which works well for more giant mugs. Check out the Breville instructions the Barista Touch for more tips.
On the touchscreen, tap the toggle under the ‘Grind’ button to select your filter basket. Remember, the size of the grind affects the taste of the coffee. Refined to a fine grind but not too powdery. Smaller numbers on the screen mean a finer grind, while more significant numbers mean a coarser grind. It may take a few tries to get the right grind size.
- Automatic Dosing:
- Make sure the hopper is securely locked and filled with fresh coffee beans.
- Make sure the filter basket is completely dry before placing the portafilter in the grinding cradle.
Press the ‘grind’ button once, or press and release the portafilter to activate the grinding switch. Allow fresh ground coffee to fill the portafilter. The grinding process will stop automatically, but you can prevent it early by pushing and releasing the portafilter.
Note:
It’s common for the portafilter to appear overfilled with ground coffee.
- Manual Dosing:
If you want to control the amount of coffee, place the portafilter in the grinding cradle and hold it to start grinding. Hold until you have as much ground coffee as you want. Release the portafilter to stop grinding.
- Tamping the Ground Coffee:
After grinding, slowly take the portafilter out of the cradle. Tap it a few times to spread the coffee evenly in the basket. Press down firmly with about 30-40 pounds (15-20 kg) of pressure. Consistent pressure is more important than correct weight. A good guideline is if the top of the tamper is flush with the top of the filter basket after pressing.
Dose Trimming with The Razor™:
The Razor™ Precision Dose Trimming Tool allows you to trim the coffee puck to the correct height for consistent extraction.
- Insert the Razor™ tool into the filter basket until its shoulder rests on the basket rim. The blade should only penetrate the surface of the tamped coffee.
- While holding the portafilter at an angle on a knock box, rotate the Razor™ back and forth to trim off any excess coffee grounds. The filter basket now contains the precise amount of coffee.
Remove any excess grounds from the rim of the filter basket to ensure a proper seal on the group head.
Purging the Group Head:
Before inserting the portafilter into the group head, run a small stream of water through it by pressing the ‘Brew’ button. This helps to stabilise the temperature before extraction.
Inserting the Portafilter:
Place the portafilter under the group head, aligning the handle with the INSERT symbol. Push the portafilter in and turn the handle towards the centre until it is tight.
Espresso Extraction:
Align the portafilter handle with the INSERT position on the group head. To insert, lift it and rotate it towards the lock position until you feel resistance.
Press the ‘Brew’ button on the display to start brewing. You can select between a single shot, double shot or custom option by touching the ‘single’, ‘double’ or custom button. You can adjust the preset extraction period.
Manual Override Function:
To start manual extraction, press and hold the ‘Brew’ button for 2 seconds. Tap the button to begin the extraction, and press it again to stop.
Note:
The amount of espresso you get depends on your grind size and settings. Press the ‘Brew’ button during a preset shot to stop it immediately. For best flavour, aim for about 1 oz (30 ml) with a 1 cup filter and 2 oz (60 ml) with a 2 cup filter.
Texturing Milk:
Different types and brands of milk froth in other ways, so you may need to adjust the froth level. Start with fresh, cold milk and fill the jug just below the spout. Lift the steam wand and place it in the milk, making sure it is completely submerged.
Rest the jug on the milk sensor in the drip tray, with the milk covering the tip of the steam wand. The toggle below the ‘Milk’ button indicates if you have positioned the jug correctly in “Breville instruction the barista touch.”
Note:
Check the screen for the correct placement of the milk jug. Below the ‘Milk’ button, you’ll see options to set the temperature and froth level based on your drink. You can adjust them by tapping To start, press the ‘Milk’ button. As the milk heats up, the screen will show its temperature.
Once the machine reaches the selected temperature, it will stop texturing. Next, lift the steam wand to remove the jug and wipe it with a damp cloth. Lower the wand backwards, and the remaining steam will automatically clear.
Note:
Before texturing, it’s a good idea to clean the steam wand. To do this, press the ‘Milk’ button once. If you want to turn off the steam, press the button again.
Manual Milk Texturing:
In manual milk texturing mode, the machine disables auto milk texturing and auto shut-off. To start frothing, lift the steam wand and press the button. When you reach your desired texture, press the milk button to stop. After you’re done, clean the wand and tip with a damp cloth. Then, lower the steam wand, and it will automatically clean itself.
Caution: Risk of Burns
Even when you turn off the machine, pressurised steam may escape. Always supervise children closely when using the machine.
Notes:
- A pumping sound is typical during steam generation; It is part of the Italian pump operation.
- The steam function will automatically deactivate after 90 seconds of continuous use.
- Use only the stainless steel milk jug included for frothing. Use in glass or plastic containers may cause hazardous conditions.
Preparing An Americano:
You can choose from three American sizes: Small (6oz / 180ml), Medium (8oz / 240ml), and Large (12oz / 360ml). After grinding and straining the coffee in your portafilter, place it at the head of the group. Place your cup under the portafilter and hot water spout. First, hot water will come out, followed by espresso.
- Hot Water Function:
The hot water feature allows you to preheat the cup or add hot water. You can start and stop the water flow by pressing ‘Hot Water’ on the screen. This function works for about 90 seconds. Depending on your cup size, you may need to press the button again to stop the flow.
Note:
Simultaneous operation of hot water and espresso extraction is not possible.
- Creating A Custom Drink:
To customise your drink, tap ‘Add New’ on the menu screen. You can change the settings based on the standard style and save your drink. If you adjust the settings manually, you can save them by tapping the small icon.
Important Tips:
Ensure you secure the drip tray in place and empty it whenever it displays the “Empty Me!” message. The machine displays the warning.
Auto-off feature:
The machine will automatically switch to AUTO-OFF mode after 30 minutes of inactivity.
- Settings Menu:
To access settings, press the icon in the upper right corner of the screen. The Quick Start Guide will help you make coffee step by step.
- Language and Units: Change the language between English and French, and switch units between °F and °C.
- Cleaning Cycle: This cycle cleans the shower screen and performs a back flush of the group head.
- Cleaning the Steam Wand: Instructions for cleaning the steam wand to remove blockages for improved steaming performance.
- Descale Cycle: To prevent mineral buildup, a pop-up notification will indicate when descaling is necessary.
- Brew Temperature: Adjust the extraction temperature to your preference.
- Default Milk Temperature: Set the default temperature for all milk-based beverages.
- Water Hardness: Test your water to find out how often you need to descale.
- Screen Brightness: Adjust the brightness of your touchscreen display.
- Sound Volume: Modify the volume of alerts and reminders.
- Demo Mode: Activate an on-screen Barista Touch™ demonstration sequence.
- Factory Reset: Use this option to revert all programmable settings to factory defaults and erase all custom drinks.
Tips For Optimal Preheating:
- Preheating Your Cup:
To keep your coffee at the right temperature, preheat your cup. Rinse it with hot water from a hot water outlet. Then, place the cup on the warming tray.
- Preheating The Portafilter And Filter Basket:
A cold portafilter and filter basket can lower the extraction temperature and make your espresso taste worse. Always preheat both with hot water from the outlet before first use.
Note:
Before adding coffee, dry the portafilter and filter basket. This helps avoid moisture, which can cause ‘channelling’. Channelling occurs when the water skips over the coffee grounds during drainage.
Choosing The Right Filter Basket:
- Single Wall Filter Baskets:
This basket is suitable for grinding whole coffee beans. They allow you to use different grind sizes, dosages and tamping techniques. It can enhance the flavor of your coffee.
- Dual Wall Filter Baskets:
These baskets work best with pre-ground coffee. They help control pressure and ensure good extraction, regardless of the grind, dose, tamp pressure or freshness of the coffee.
Note:
Whichever filter basket you use, choose a 1-cup basket for one serving and a 2-cup basket for two servings, or a sturdy single cup. Change grind size and amount while switching between baskets. Use about 8-10 grams of coffee for a 1-cup basket and 15-18 grams for a 2-cup basket.
Understanding Grind Size:
When grinding the coffee beans, aim for a fine texture, but don’t grind them too finely. Grind size affects how water flows through the coffee grounds and the taste of your espresso. If it is too fine, such as powder or flour, the water will not flow well. This can cause over-extraction, making the espresso dark and bitter.
If the grind is too coarse, water passes through too quickly. This leads to less extraction, resulting in poor colour and flavour. For best results, follow the Breville instruction the Barista Touch guidelines for grind size.
PULLING A SHOT OF ESPRESSO:
Place your warm cup(s) under the portafilter and press the ‘Brew’ button for the amount you want. Espresso may not flow immediately due to pre-infusion time. A great espresso has a nice balance of sweetness, acidity and bitterness.
This balance depends on the type of coffee bean, its roast darkness, freshness, grind size, coffee amount, and tamping pressure. Try changing one of these factors at a time to discover your favourite scent.
EXTRACTION GUIDELINES:
- Ideal Extraction:
- Flow begins after 8-12 seconds.
- Flow resembles warm honey.
- Crema appears golden brown with a fine texture.
- Espresso is a rich dark brown.
- Under-Extraction
- The flow starts after 1-7 seconds.
- Flow is rapid, like water.
- Crema is thin and pale.
- Espresso appears pale brown, tasting bitter, sharp, weak, and watery.
- Over-Extraction:
- The flow starts after 13 seconds.
- Flow may drip or stop altogether.
- Crema is dark and spotty.
- Espresso is very dark brown with a bitter, burnt flavour.
After Extraction Procedures:
- Removing Used Grinds:
Once you extract the espresso, the grounds used will form a coffee puck. If the puck is wet, refer to the ‘Under Extraction’ section for troubleshooting.
- Cleaning The Filter Basket:
To prevent blockage, keep the filter basket clean. Lock the portafilter without coffee grounds and run hot water through it, choosing either the single or double cup option.
- Solutions To Common Issues:
Use a tamping pressure of 30-40 lbs (15-20 kg). After tamping, the metal cap of the tamper should be level with the top of the filter basket. Use the Razor™ tool to trim the coffee puck for a consistent layer.
- Milk Texturing Techniques:
Texturing milk has two main steps: first, aerate the milk to expand it, then swirl it to make it silky. These steps should happen smoothly one after the other.
- Start with Fresh, Cold Milk:
- Fill a milk jug under the spout. Make sure there is enough milk to cover the steam wand ring.
- Place the steam wand in the drip tray and press the milk button to release the steam for a few seconds. Press the button again to stop and clear any condensation.
- Check Steam Wand Position:
- Fully lower the steam wand for best performance. Make sure the holes around the steam tip are clear, as blockages can affect the quality of the foam.
- Pre-Cleaning the Wand:
- Wipe the steam wand and tip with a damp cloth before putting it down. This helps the auto-cleaning to work better.
- Post-Texturing Process:
- After texturing, tap the jug on the countertop to break up any bubbles and swirl the jug to mix the texture.
- Pour the milk directly into the espresso to prevent separation.
Manual Texturing Procedure:
- Position the Steam Wand:
Lift the steam wand and place the steam tip 0.4-0.8 inches (1-2 cm) below the surface of the milk near the 3 o’clock position of the jug. or manual frothing on the Breville instruction The Barista Touch, press and hold the ‘Milk’ button for about three seconds, then press again to start frothing.
- Create a Vortex:
Place the steamer tip under the surface of the milk until you see a swirling effect. Lower the jug slowly to bring the steam tip closer to allow air to enter the milk. Touch the surface of the milk lightly so that it swirls properly.
- Monitor And Control Temperature:
Keep the steam tip just below or just above the surface while maintaining a swirling motion. Watch the milk temperature on the screen, aiming for 130°F to 150°F (55°C to 65°C).
- Stop Steaming:
Press the milk button to stop steaming before removing the steam wand from the milk.
Adjusting Grind Settings:
For some coffee types, you can adjust the top burr to change the grind size. It helps improve drainage. It’s recommended to change just one setting at a time. Refer to the “Breville instruction the barista touch” for guidance.
- Unlock The Hopper:
Place the hopper over a container and turn the dial to release the beans.
- Adjusting the Burrs:
After closing the hopper and upper burr, use the wire handle to adjust the upper burr. Turn it to make the grind coarser or finer. Make sure the handle opening lines up before locking it back into place.
- Check Extraction Quality:
After adjustments, monitor your extraction process.
4. Maintaining The Touch Screen:
To ensure the touch screen works properly, keep it dry and clean.
Replacing The Water Filter:
- Filter Preparation:
Soak the filter for five minutes before assembly.
- Installation:
Connect all parts and install the filter in the water tank.
- Replacement Schedule:
Change the filter every 90 days or after using 40 litres (10.6 US gallons) of water. This helps reduce scale build-up and minimises the need for descaling. If your water hardness is level 2, you can use filters up to 16 US gallons (60 litres).
Cleaning Cycle:
You will receive a message when the cleaning cycle is due. This cycle is different from descaling and is for back-flushing. Simply adhere to the prompts displayed on the screen.
Descaling The Machine:
Hard water can build up minerals in your machine over time. This can impact the brewing quality of the coffee. If you see any build-up, descale the machine, even if you use a water filter. Go to the ‘Settings’ menu and select ‘Dayscale Cycle’ to follow the instructions.
Caution:
Avoid submerging the power cord, plug, or the appliance itself in water. Keep the water tank in place when descaling.
Grinder Cleaning:
Conical burr grinders require a particular cleaning cycle to remove oil build-up. It helps to work well. Consult “Breville instruction the Barista Touch” for guidance on the cleaning process.
- Initial Steps:
Unlock and empty the hopper before replacing it and locking it again.
- Complete the Cleaning:
Run the grinder without coffee. Then, unlock the top bur and take off. Clean both the top and bottom bores as well as the chute using a brush.
Advanced Grinder Maintenance:
If there’s a blockage between the burrs and the outlet, follow these steps:
- Remove Hopper:
Set the grind size to the best (1) and loosen the nut with a 10mm socket.
- Unlock and Clean:
Adjust the grind size to the coarsest (30), unlock and remove the top burr, then thoroughly clean the components before reassembling.
Steam Wand Maintenance:
Clean the steam wand after each use to keep it working correctly. Wipe it with a wet cloth. If you block a hole, check the cleaning guide in ‘Settings.’
Filter Basket And Portafilter Cleaning:
After use, rinse the filter basket and portafilter under hot water to remove residual coffee oils. If any holes are blocked, use a cleaning tool to clear them. For stubborn blockages, soak a clean tablet in the solution for about 20 minutes before rinsing.
Shower Screen Cleaning:
Use a damp cloth to wipe the inside of the group head and shower curtain. This will help remove any coffee bits. Run the machine regularly with an empty filter basket to clean out residual coffee.
Drip Tray And Storage Tray Maintenance:
Remove and clean the drip tray often, especially when the indicator shows it is complete. Use warm, soapy water to clean all parts and dry them thoroughly. You can wipe the storage tray with a soft cloth.
Note:
Always wash components by hand with warm water and mild dish soap. Avoid using abrasive items that can scratch surfaces. Do not clean them in the dishwasher.
Maintaining The Exterior And Cup Warming Tray:
To keep the outer housing and cup warming tray clean, use a soft, damp cloth. Then, polish with a smooth, dry cloth. Avoid using abrasive cleaners, pads or cloths to prevent scratches. Follow these steps from “Breville instruction the barista touch” for best results.
Proper Storage Of Your Machine:
Before storing your machine, turn it off by pressing the power button and unplug it. Remove unused beans from the hopper and clean the grinder. Empty the water tank and drip tray. Make sure the machine is cool, clean and dry. Place all items in the storage tray. Keep the machine upright, and do not place anything on top of it.
Caution:
Avoid putting the power cord, plug, or appliance into water or any other liquid.
Replacing The Silicone Seal:
After a while, the silicone seal around the shower curtain may need to be replaced. This helps keep brewing performance at its best.
- Power Off The Machine:
To switch off the machine, simply press the power button. Then, unplug the cord from the power outlet.
- Remove Components:
Gently remove the water tank and drip tray. Be careful not to spill anything when they are full.
- Clean The Screw:
Use a skewer or similar tool to remove coffee residue from the centre of the screw.
- Loosen The Screw:
Use a flat-head screwdriver to turn the screw to the centre. Rotate it to the left (counterclockwise) to release it.
- Remove And Clean the Shower Screen:
After loosening the screws, carefully remove it and the stainless steel shower screen. Note which side of the screen is facing down when reassembling. Wash the shower curtain with warm, soapy water and dry thoroughly.
- Replace The Silicone Seal:
Use your fingers or long-nosed pliers to pry out the old silicone seal. Place the new seal in so that the flat side is in and the rib side is out. Clean the centre of the screw before putting the screwdriver back in.
- Reassemble:
Put the shower screen back in and then insert the screws. Turn the screw clockwise 2-3 times with your fingers. Then, use the flat-head screwdriver to tighten it until it’s flush with the shower screen. Be careful not to over-tighten.
- Reattach The Components:
Place the drip tray and water tank back into position.
If you need assistance with a new silicone seal or assistance, contact Breville Consumer Support. You can visit the Breville website for more information.
Transporting And Storing Your Machine:
To prepare your machine for moving or storage, first turn it off by pressing the power button and unplugging it. Next, scoop out the unused beans from the hopper. Clean the grinder and empty the water tank and drip tray.
Make sure the machine is cool, clean and dry. Place all items in the storage tray. Keep the machine upright, and do not place anything on top of it.
Find more details: https://www.breville.com/content/dam/breville/au/assets/miscellaneous/instruction-manual/espresso/BES880-instruction-manual.pdf